Drywall Installation

Drywall Textures and Finishes: Adding Character to Your Walls

by Ontario Drywall |August 17, 2023 |0 Comments | Drywall Installation


When it comes to interior design, walls are your canvas. At Ontario Drywall and Taping, we believe that drywall isn’t just a surface; it’s an opportunity for artistic expression. In this article, we’ll explore the captivating world of drywall textures and finishes and how they can infuse your spaces with character and charm. Join us as we take a journey into the realm of design possibilities.

Textured Elegance: Elevating Visual Interest

Smooth walls have their place, but textured walls bring an entirely new dimension to your interiors. From subtle textures that add depth to bold patterns that demand attention, textured walls can be customized to match your style and vision.

Different Texturing Techniques

Our experts at Ontario Drywall and Taping are skilled in a range of texturing techniques that can transform your walls. Popular choices include:

Skip Trowel Texture: This technique creates a textured surface with subtle, irregular patterns that catch and reflect light in fascinating ways.

Knockdown Texture: Offering a rustic yet refined appearance, knockdown texture involves applying a textured compound and then flattening it for a slightly uneven surface.

Orange Peel Texture: Mimicking the texture of an orange peel, this technique adds a subtle, consistent texture that adds visual interest without being overwhelming.

Swirl Texture: Swirl patterns lend a sense of elegance to your walls with their graceful and flowing designs.
Comb Texture: Combining both fine and coarse textures, this technique creates a striking pattern that catches the eye.

Expressing Your Style Through Finishes

Drywall finishes are the final touch that can turn your walls into a masterpiece. From classic finishes to contemporary styles, each finish brings its own unique personality to a room.

Venetian Plaster Finish: This luxurious finish mimics the look of polished marble, adding a timeless and sophisticated elegance to your space.

Sponging Finish: Achieve a playful and organic appearance with a sponge-applied finish that adds depth and dimension to your walls.

Metallic Finish: For a touch of modern glamour, metallic finishes offer a reflective and eye-catching surface that enhances ambient lighting.

Distressed Finish: Create a rustic or vintage ambiance by distressing your walls, giving them a weathered and lived-in appearance.

The Ontario Drywall and Taping Touch

At Ontario Drywall and Taping, we understand the importance of personalized spaces. Our experts are skilled in creating textures and finishes that align with your design vision. We take pride in turning your walls into unique pieces of art that reflect your style and personality.

Unleash your creativity and infuse your living spaces with character. Contact Ontario Drywall and Taping today to explore the world of drywall textures and finishes. Our experts are ready to transform your walls into stunning works of design that captivate the senses.

Soundproofing and Insulation Techniques with Drywall Installation

by Ontario Drywall |August 14, 2023 |0 Comments | Drywall Installation


When it comes to creating a comfortable and peaceful living environment, soundproofing and insulation are essential factors to consider. At Ontario Drywall and Taping, we understand the importance of proper soundproofing and insulation techniques during drywall installation. In this article, we’ll delve into the transformative benefits of integrating these techniques into your project and how our experts can help you achieve a haven of serenity.

The Power of Soundproofing: Transforming Noise to Serenity

Unwanted noise can greatly impact your quality of life, whether you’re dealing with street sounds, neighboring activities, or even internal echoes within your space. Proper soundproofing techniques applied during drywall installation can significantly reduce these disturbances, allowing you to enjoy peace and privacy within your own home.

Understanding Sound Transmission

Before delving into soundproofing methods, it’s crucial to understand how sound travels. Sound can move through walls, ceilings, and floors, transferring unwanted noise from one area to another. With the right techniques, you can interrupt this sound transmission and create a sound barrier that ensures tranquility in every room.

Creating an Effective Sound Barrier

Our experts at Ontario Drywall and Taping employ various techniques to create effective sound barriers. We use specialized soundproofing materials, such as acoustic drywall and insulation, which absorb and dampen sound waves. Double-layer drywall installations with resilient channels can further reduce noise transmission by preventing direct contact between layers.

Insulation: Comfort Beyond Temperature Control

Insulation is not only about regulating temperature; it also plays a pivotal role in soundproofing and creating a comfortable living environment. During drywall installation, proper insulation can minimize sound transfer while also enhancing the thermal efficiency of your space.

Choosing the Right Insulation Materials

The selection of insulation materials is critical to achieving optimal results. Fiberglass insulation, cellulose insulation, and mineral wool are popular choices for both sound and thermal insulation. Our experts assess your space’s needs and recommend the appropriate insulation type and density for maximum effectiveness.

A Comprehensive Approach by Ontario Drywall and Taping

At Ontario Drywall and Taping, we take a comprehensive approach to soundproofing and insulation during drywall installation. Our team of experienced professionals ensures that every detail is addressed, from selecting the right materials to employing precise installation techniques.

We understand that your home is a sanctuary, and we’re committed to helping you create a space of comfort and tranquility. Whether you’re dealing with external noise or seeking to improve energy efficiency, our soundproofing and insulation expertise can make a significant difference.

Transform Your Space with Ontario Drywall and Taping

Say goodbye to unwanted noise and temperature fluctuations. Contact Ontario Drywall and Taping today to learn more about our soundproofing and insulation techniques during drywall installation. Our experts are ready to guide you toward a more comfortable and serene living environment.

Step-by-Step Process of Tapping and Mudding for Seamless Drywall Surfaces

by Ontario Drywall |July 4, 2023 |0 Comments | Drywall Installation


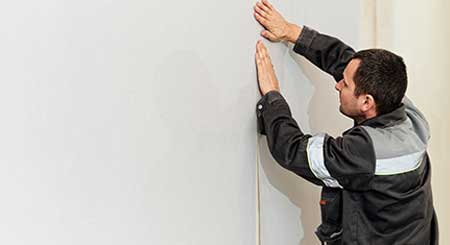
When it comes to drywall installation, taping, and mudding are critical steps in creating seamless and visually appealing surfaces. Tapping reinforces joints and prevents cracks, while mudding conceals imperfections and provides a smooth finish. In this blog post, we will guide you through the step-by-step process of tapping and mudding, providing you with the knowledge to achieve flawless drywall surfaces in your home or project.

Preparing the Surface

Before starting the tapping and mudding process, ensure the drywall surface is clean, free of dust, and properly secured to the studs. Inspect for any visible defects or uneven areas, addressing them before proceeding.

Taping

  • Begin by applying a layer of joint compound, also known as mud, over the seams using a drywall trowel or putty knife.
  • Place the tape over the wet compound, run it along the length of the joint, and press it firmly into the compound.
  • Use the trowel or putty knife to smooth out the tape, ensuring it is firmly embedded in the compound and free of wrinkles or bubbles.
  • Repeat the process for all joints, including horizontal and vertical seams, as well as corners.

First Coat of Mudding

  • Once the tape is in place, apply the first coat of mud over the taped seams and screws using a wider trowel or drywall knife.
  • Spread the mud smoothly and evenly, feathering the edges outward to create a gradual transition.
  • Be careful not to apply too much pressure, as it may dislodge the tape or create uneven surfaces.

Sanding and Second Coat

  • Allow the first coat of mud to dry completely, following the manufacturer’s instructions.
  • Once dry, lightly sand the surface to remove any ridges or imperfections, ensuring a smooth finish.
  • Apply a second coat of mud, extending it beyond the first coat to cover any remaining gaps or imperfections.
  • Feather the edges of the second coat, blending it seamlessly with the surrounding area.

Final Coats and Sanding

  • Allow each subsequent coat of mud to dry completely, sanding lightly between coats to achieve a smooth and even surface.
  • Apply additional coats as needed, focusing on achieving a uniform and seamless finish.
  • Pay attention to details such as corners and edges, ensuring they are properly smoothed and blended.

Finish Sanding and Finishing

  • Once all coats of mud are dry and the surface is smooth, perform a final sanding to remove any remaining imperfections.
  • Clean the surface thoroughly to remove dust and debris.
  • At this stage, the drywall is ready for priming and painting or any other desired finishing treatments.

Achieving seamless drywall surfaces requires proper tapping and mudding techniques. By following the step-by-step process outlined in this blog post, you can ensure a flawless finish for your drywall installation project. Count on Ontario Drywall And Taping for all your drywall and taping requirements. We guarantee exceptional quality and customer satisfaction in every project we undertake.

Understanding the Role of Tapping and Mudding in Drywall Installation

by Ontario Drywall |July 3, 2023 |0 Comments | Drywall Installation


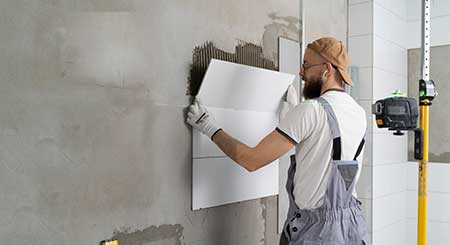
Drywall installation is a fundamental step in creating a smooth and visually appealing surface for your walls and ceilings. To achieve a seamless and professional finish, two essential techniques come into play: tapping and mudding. In this blog post, we will delve into the importance of tapping and mudding in drywall installation and explore the techniques involved to help you understand their role in creating a flawless end result.

What is Tapping?

Tapping, also known as drywall taping, involves applying paper or fiberglass mesh tape to cover the joints and seams between drywall panels. It serves as a reinforcement, preventing cracks and visible seams from appearing on the finished surface. Tapping creates a seamless transition between panels, ensuring a solid foundation for the subsequent mudding process.

The Importance of Tapping

Tapping is a crucial step in drywall installation because it reinforces the joints and prevents unsightly cracks and gaps from forming over time. It helps to create a smooth and level surface, ensuring that the mudding compound adheres properly and provides a seamless finish. Properly executed tapping is essential for long-lasting, visually appealing walls and ceilings.

What is Mudding?

Mudding, also referred to as a joint compound application, involves applying a layer of joint compound over the taped joints and screws in the drywall. The compound is then smoothed out and feathered along the edges to create a seamless surface. This process fills in any gaps, covers the tape, and conceals the joints, creating a uniform and flawless appearance.

The Importance of Mudding

Mudding is a critical step in achieving a professional finish in drywall installation. It covers the taped joints, screws, and imperfections, creating a smooth and seamless surface ready for painting or other finishing treatments. The mudding compound also provides additional structural integrity to the drywall, making it more resistant to cracks and damage.

Techniques for Tapping and Mudding

Tapping and mudding require specific techniques to achieve optimal results. These techniques include properly prepping the surface, applying the tape with even pressure and minimal wrinkles, and applying multiple layers of joint compound in thin, feathered coats. Sanding and smoothing between each coat are crucial to achieve a seamless finish. It is also important to pay attention to drying times and sanding techniques to ensure a smooth and even surface before proceeding with any further finishing.

By understanding the role and techniques involved in tapping and mudding, you can achieve flawless and visually appealing walls and ceilings in your home or project. Whether you undertake the task yourself or hire a professional, proper tapping and mudding techniques are vital for a successful drywall installation.

When it comes to taping service in Toronto, you can rely on the expertise of Ontario Drywall And Taping. Our team of professional drywall and taping contractors in Toronto ensures a high-quality and mess-free experience for all your taping needs.

Transform Your Home with These Drywall Renovation Ideas

by Ontario Drywall |February 23, 2023 |0 Comments | Drywall Installation, Drywall Repair, Tips

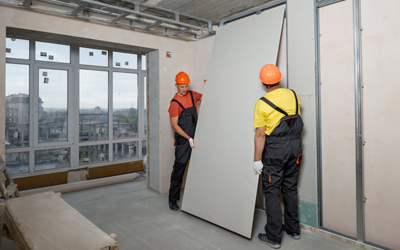
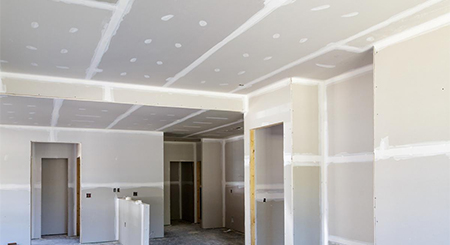
Drywall renovation projects can completely transform the look and feel of your home. Whether you’re looking to create a smooth, modern finish or add some texture to your walls, Ontario Drywall and Taping has got you covered. Here are some drywall renovation ideas to help you get started:

  1. Smooth Finish: A smooth finish is a classic choice for a clean and modern look. It involves using joint compound and sanding the walls to create a completely flat surface. This finish is perfect for adding a fresh coat of paint or wallpaper to your walls.
  2. Textured Finish: If you’re looking to add some visual interest to your walls, a textured finish might be the way to go. Ontario Drywall and Taping offers a variety of textures, including knockdown, popcorn, and orange peel. Textured finishes are great for hiding imperfections and creating a cozy, welcoming atmosphere.
  3. Coffered Ceiling: Coffered ceilings add depth and dimension to any room. This type of ceiling features a series of sunken panels that create a grid-like pattern. Coffered ceilings are perfect for adding a touch of elegance to a living room or dining room.
  4. Accent Wall: An accent wall is a great way to add some drama to a room without committing to a full renovation. Ontario Drywall and Taping can create an accent wall using drywall, which can be painted or wallpapered to add some color or pattern to your space.
  5. Curved Walls: If you’re looking for a truly unique feature, consider adding curved walls to your home. Curved walls can be used to create a dramatic entryway or to add a focal point to a living room or bedroom.

By incorporating these drywall renovation ideas into your home, you can transform your space and add value to your property. Contact Ontario Drywall and Taping today to learn more about our drywall services and how we can help you create the home of your dreams.


How Drywall Installation Can Give Your Home a Polished Look

by Ontario Drywall |December 15, 2022 |0 Comments | Drywall Installation, Drywall Repair, Tips

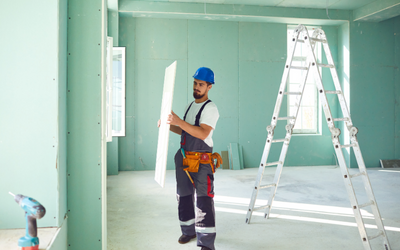
Whether you’re getting ready to sell your home or just want to spruce it up, drywall installation is the easiest way to give your home a polished look. Drywall is an essential part of any interior renovation project and is used in many homes in Toronto. It provides a smooth surface that can be painted or wallpapered and gives your home an elegant finish. Let’s explore how drywall installation can improve the look of your home.

Drywall Installation Basics

Drywall installation involves mounting sheets of drywall onto the wall frame with screws or nails. The drywall needs to be cut to fit any alcoves, corners, doors, and windows in the room where it’s being installed. Once the drywall has been secured in place, joints are filled with joint compound or mud and sanded down until they are smooth. This process will help ensure there are no bumps or rough spots on the walls when they are painted or wallpapered.

Benefits of Professionally Installing Drywall

When it comes to renovating your home, hiring a professional for drywall installation offers many benefits. Those include:

– Properly installing and finishing drywalls requires skill and experience; if done incorrectly, you could end up with costly repairs later on. A professional will make sure the job is done right from start to finish, so you don’t have to worry about redoing it yourself later on.

– Professionals understand all aspects of drywall installation and can advise you on which type of materials will work best for your specific project—from wood studs to fiberglass insulation—and how to use them effectively.

– They also know how much material you need for each job as well as what types of tools you need for cutting and securing drywalls into place. This helps save time and money by eliminating guesswork from the equation.

– Professional contractors also provide after-care services like cleaning up after the job is finished so that everything looks neat and tidy when they leave your property.

Drywall installation may seem like a daunting task but with the help of a professional contractor in Toronto, it doesn’t have to be! Installing new drywalls can transform any room quickly and easily, giving it a polished look that will last for years to come. So if you’re looking for an easy way to upgrade your home’s interior design without breaking the bank, consider investing in professional drywall installation services today!


Drywall Installation – What You Need To Know

by Ontario Drywall |November 28, 2022 |0 Comments | Drywall Installation, Drywall Repair, Tips

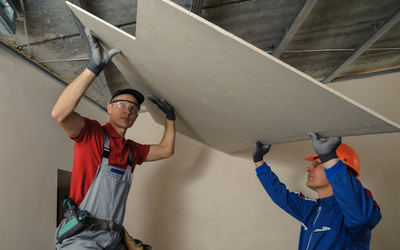
Installing drywall is a major part of any home renovation project and it’s important to know the proper techniques for installation. If you’re planning on tackling a drywall installation project, it’s essential to understand the basics of drywall installation so that you can ensure the job is done right. Here are some tips and tricks to get you started.

Measuring the Space and Buying Materials

The first step in any drywall project is to measure the space that needs to be covered with drywall. It’s important to measure accurately so that you buy enough material for your project, as well as enough tape and joint compound (or “mud”) for taping and finishing. Once you’ve measured your space, you can go ahead and purchase the appropriate number of panels of drywall for your project.

Hanging the Drywall

When it comes time to hang the drywall, make sure you have a helper on hand to help lift and position panels. Before mounting panels, take a few minutes to check them for damage. Once all panels have been checked, start by screwing horizontal rows onto studs or furring strips at 16-inch intervals. Be sure not to over tighten screws as this could cause issues during finishing. Make sure that screw heads are slightly below the surface of each panel before moving on to vertical rows which should also be spaced at 16-inch intervals along horizontal rows of boards.

Taping & Finishing 

Once all panels are mounted properly, it’s time for taping and finishing. First up is taping your seams with paper tape or fiberglass mesh tape; both will work fine but if you want extra strength go with fiberglass mesh tape as it has more adhesive properties than paper tape does. After taping seams, use joint compound over seams and screw heads until they are flush with walls then let compound set overnight before sanding down excess mud using 120-grit sandpaper or an electric sander if available. Finally, apply two coats of primer followed by two coats of paint (or texture) in color/texture of choice; again letting primer set overnight between coats before adding second coat of paint or texture finish depending on desired look for wall surfaces being finished off with drywall installation process in home renovation projects!

Drywalls are essential components in many home renovations projects because they give walls a finished look while also providing insulation from sound and temperature fluctuations within homes! There are several steps involved in successful drywall installation including measuring spaces accurately, purchasing materials accordingly, hanging boards properly utilizing studs/furring strips at 16 inch intervals horizontally & vertically while also taking into account possible damage before mounting boards! Taping & finishing involve use of paper or fiberglass mesh tapes over seams while then applying joint compounds covering screw heads flush against walls after which primer & paint (or texture) can be applied respectively in order complete drywall installation process properly! Utilize these tips & tricks when attempting own DIY projects involving drywalls & achieve best results possible without having hire professional Drywall contractors unnecessarily! Happy renovating!

All Things You Know About Drywall

by Ontario Drywall |February 3, 2022 |0 Comments | Drywall Installation, Drywall Repair, Tips

All Things You Know About Drywall
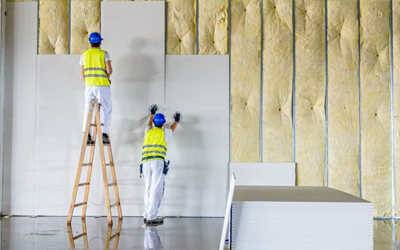
Drywalls are very cost-effective and lightweight. These are not only used to complete the construction but to embellish your house. These walls are also known as gypsum board, Sheetrock, or wall board. Installation of these walls is not as easy as you would think. How much do you really know about the product? Here are a few important things you need to know about the drywall.

  1. Not All Drywall Is The Same: You will get numerous types of drywall in the market. There is no surprise why so many homeowners turn to a professional drywall company for assistance. One of the biggest advantages of this material is that it have gypsum. Gypsum is a soft sulfate material that contains water and it helps to stop the expansion of the fire.
  2. It Is Not Just A Wall: Drywall is not only used for walls and ceilings. But it is also the material to decorate the room. It is also used to make shelves, partitions, arched openings, false ceilings, moldings, and many more. It is one of the best solutions when you want to decorate your room in an easy way.
  3. It Can Be Repaired: There are chances that drywall can crack. If you face this kind of problem, you don’t need to worry, repair of this material is possible. Small cracks and holes can be easily repaired. The great news is that damage that may need the replacement of an entire sheet will not create a mess in your house.
  4. Its Installation Is A Task For Pros Only: Many people think that can install it on their own with many DIY instructions. But it is not as easy as ABC. It requires experience and knowledge to get the job done. Whether it is a lightweight construction material but requires a professional to install it properly.

Let Ontario Drywall And Taping Help You!

Are you planning for a wall remodeling? If you want to enhance the value of your premises, you can install drywall. Let our professionals help you with your project. Give us a call today and we will take care of your project.

Benefits of Having Drywall

by Ontario Drywall |December 20, 2021 |0 Comments | Drywall, Drywall Installation, Tips

Benefits of Having Drywall
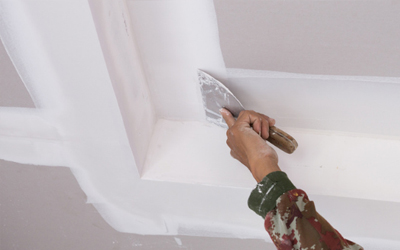
Want to give an elegant look to your space? Want to create more usable, finished space? Drywall is an awesome solution that can efficiently remedy these problems. Drywall installation is a budget-friendly and convenient way to enhance the value of your premises. Installing drywall can lead to several benefits like its reasonable price point. Giving yourself the opportunity to create a more functional space is an excellent perk.

  1. Easy To Purchase & Install: Drywall is one of the most popular building materials. It is a relatively light material and easy to install around existing fixtures like lighting and ceiling fans. It is much easy to purchase and affordable than plaster walls or paneling. Ease of installation and repair make it a wildly popular choice.
  2. Insulation Properties: When it comes to insulation, not many popular materials can compare to drywall. Does not matter how the weather at outside, it helps any room retain its temperature. It will not only make your space cozy and comfortable, but it will also reduce your power bill cost all year long. A competent drywall technician can explain further.
  3. Add Safety Features: Drywall has some helpful built-in safety features. You can choose this material to enhance the safety benefits. Installing drywall will make your space less susceptible to fire damage. It also creates a barrier that can slow the spread of flames from room to room. It can also lessen the amount of mold that grows between the walls.
  4. Easily Repairable: It is one of the greatest benefits that it can be easily repaired. The process of repair is easy and cost-effective. Even major damage can often be repaired by only impacting the affected area. Drywall will suffer wear and tear and scratch will occur. These drywall blemishes are super easy to fix.

Whether you want to install drywall in a new space or to add an extra layer to a wall or ceiling, you will love your refreshed look. Looking for drywall installation and repair services in Ontario, Ontario Drywall And Taping will assist you to increase the value of your space.

How to get the Electrical Wiring job done in the Drywall?

by Ontario Drywall |October 18, 2021 |0 Comments | Drywall Installation, Electrical Wiring, Tips

How to get the Electrical Wiring job done in the Drywall?
Does cutting into the drywall seem a really challenging and daunting task to you? Well, it can be so for the house owners. However, cutting into the drywall might be beneficial and necessary for the house to create an extra outlet, power for another appliance, or new lights.

Of course, you can learn to cut through the drywall, but it is always better for the house owners to go to the professionals to get the deed done.
Tips to take care while cutting into the Drywall

Stay Safe and Clean

One of the most important things about cutting into the drywall is the necessity to stay safe and clean. Also, make sure that you turn off all the electric power before you start to work upon the project or let the professional work upon it. Besides this, keep a cloth under the working area to collect the dust in one place, so that it does not create a mess in the room. Remember to make sure that the cloth can be discarded and cleaned later on.

Locate the Electrical Wires and Studs

You need to locate the electrical wires before you get into the working. Professionals can surely tell which area contains the electrical wires and studs. Once you find them, mark them as per your convenience- it can be via electrical or painters’ tape.

Make the First Cut

A manual Jab saw can be used to make such drywall cuts. However, if you hire a professional, they can get your work done without any hassle and within budget. When the cut is made, make sure that the equipment is handled with proper care and safety.

Patch up the Drywall

After you have installed the electrical wires, it is time to patch them up and test the sockets for power. Professionals will make sure that the things work properly and do not create a hassle for the house owners.

Want to install or repair the drywall in your house? Reach out to the experts at Ontario Drywall and Taping today. Call them to get your quote.