Drywall Repair

Transform Your Home with These Drywall Renovation Ideas

by Ontario Drywall |February 23, 2023 |0 Comments | Drywall Installation, Drywall Repair, Tips

Drywall renovation projects can completely transform the look and feel of your home. Whether you’re looking to create a smooth, modern finish or add some texture to your walls, Ontario Drywall and Taping has got you covered. Here are some drywall renovation ideas to help you get started:

  1. Smooth Finish: A smooth finish is a classic choice for a clean and modern look. It involves using joint compound and sanding the walls to create a completely flat surface. This finish is perfect for adding a fresh coat of paint or wallpaper to your walls.
  2. Textured Finish: If you’re looking to add some visual interest to your walls, a textured finish might be the way to go. Ontario Drywall and Taping offers a variety of textures, including knockdown, popcorn, and orange peel. Textured finishes are great for hiding imperfections and creating a cozy, welcoming atmosphere.
  3. Coffered Ceiling: Coffered ceilings add depth and dimension to any room. This type of ceiling features a series of sunken panels that create a grid-like pattern. Coffered ceilings are perfect for adding a touch of elegance to a living room or dining room.
  4. Accent Wall: An accent wall is a great way to add some drama to a room without committing to a full renovation. Ontario Drywall and Taping can create an accent wall using drywall, which can be painted or wallpapered to add some color or pattern to your space.
  5. Curved Walls: If you’re looking for a truly unique feature, consider adding curved walls to your home. Curved walls can be used to create a dramatic entryway or to add a focal point to a living room or bedroom.

By incorporating these drywall renovation ideas into your home, you can transform your space and add value to your property. Contact Ontario Drywall and Taping today to learn more about our drywall services and how we can help you create the home of your dreams.


How Drywall Installation Can Give Your Home a Polished Look

by Ontario Drywall |December 15, 2022 |0 Comments | Drywall Installation, Drywall Repair, Tips

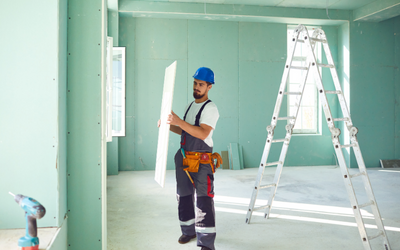
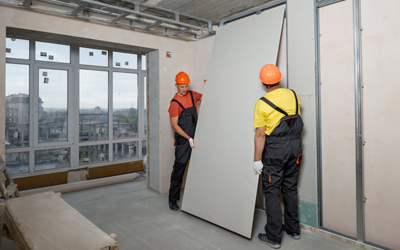
Whether you’re getting ready to sell your home or just want to spruce it up, drywall installation is the easiest way to give your home a polished look. Drywall is an essential part of any interior renovation project and is used in many homes in Toronto. It provides a smooth surface that can be painted or wallpapered and gives your home an elegant finish. Let’s explore how drywall installation can improve the look of your home.

Drywall Installation Basics

Drywall installation involves mounting sheets of drywall onto the wall frame with screws or nails. The drywall needs to be cut to fit any alcoves, corners, doors, and windows in the room where it’s being installed. Once the drywall has been secured in place, joints are filled with joint compound or mud and sanded down until they are smooth. This process will help ensure there are no bumps or rough spots on the walls when they are painted or wallpapered.

Benefits of Professionally Installing Drywall

When it comes to renovating your home, hiring a professional for drywall installation offers many benefits. Those include:

– Properly installing and finishing drywalls requires skill and experience; if done incorrectly, you could end up with costly repairs later on. A professional will make sure the job is done right from start to finish, so you don’t have to worry about redoing it yourself later on.

– Professionals understand all aspects of drywall installation and can advise you on which type of materials will work best for your specific project—from wood studs to fiberglass insulation—and how to use them effectively.

– They also know how much material you need for each job as well as what types of tools you need for cutting and securing drywalls into place. This helps save time and money by eliminating guesswork from the equation.

– Professional contractors also provide after-care services like cleaning up after the job is finished so that everything looks neat and tidy when they leave your property.

Drywall installation may seem like a daunting task but with the help of a professional contractor in Toronto, it doesn’t have to be! Installing new drywalls can transform any room quickly and easily, giving it a polished look that will last for years to come. So if you’re looking for an easy way to upgrade your home’s interior design without breaking the bank, consider investing in professional drywall installation services today!


Drywall Installation – What You Need To Know

by Ontario Drywall |November 28, 2022 |0 Comments | Drywall Installation, Drywall Repair, Tips

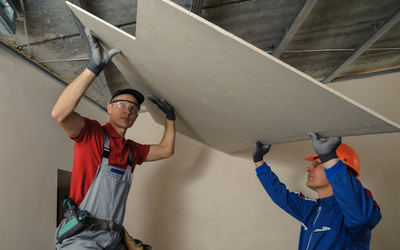
Installing drywall is a major part of any home renovation project and it’s important to know the proper techniques for installation. If you’re planning on tackling a drywall installation project, it’s essential to understand the basics of drywall installation so that you can ensure the job is done right. Here are some tips and tricks to get you started.

Measuring the Space and Buying Materials

The first step in any drywall project is to measure the space that needs to be covered with drywall. It’s important to measure accurately so that you buy enough material for your project, as well as enough tape and joint compound (or “mud”) for taping and finishing. Once you’ve measured your space, you can go ahead and purchase the appropriate number of panels of drywall for your project.

Hanging the Drywall

When it comes time to hang the drywall, make sure you have a helper on hand to help lift and position panels. Before mounting panels, take a few minutes to check them for damage. Once all panels have been checked, start by screwing horizontal rows onto studs or furring strips at 16-inch intervals. Be sure not to over tighten screws as this could cause issues during finishing. Make sure that screw heads are slightly below the surface of each panel before moving on to vertical rows which should also be spaced at 16-inch intervals along horizontal rows of boards.

Taping & Finishing 

Once all panels are mounted properly, it’s time for taping and finishing. First up is taping your seams with paper tape or fiberglass mesh tape; both will work fine but if you want extra strength go with fiberglass mesh tape as it has more adhesive properties than paper tape does. After taping seams, use joint compound over seams and screw heads until they are flush with walls then let compound set overnight before sanding down excess mud using 120-grit sandpaper or an electric sander if available. Finally, apply two coats of primer followed by two coats of paint (or texture) in color/texture of choice; again letting primer set overnight between coats before adding second coat of paint or texture finish depending on desired look for wall surfaces being finished off with drywall installation process in home renovation projects!

Drywalls are essential components in many home renovations projects because they give walls a finished look while also providing insulation from sound and temperature fluctuations within homes! There are several steps involved in successful drywall installation including measuring spaces accurately, purchasing materials accordingly, hanging boards properly utilizing studs/furring strips at 16 inch intervals horizontally & vertically while also taking into account possible damage before mounting boards! Taping & finishing involve use of paper or fiberglass mesh tapes over seams while then applying joint compounds covering screw heads flush against walls after which primer & paint (or texture) can be applied respectively in order complete drywall installation process properly! Utilize these tips & tricks when attempting own DIY projects involving drywalls & achieve best results possible without having hire professional Drywall contractors unnecessarily! Happy renovating!

All Things You Know About Drywall

by Ontario Drywall |February 3, 2022 |0 Comments | Drywall Installation, Drywall Repair, Tips

All Things You Know About Drywall
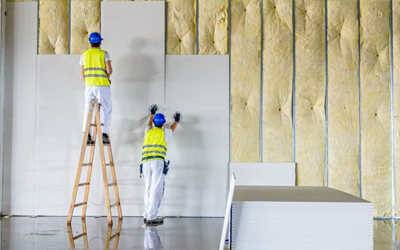
Drywalls are very cost-effective and lightweight. These are not only used to complete the construction but to embellish your house. These walls are also known as gypsum board, Sheetrock, or wall board. Installation of these walls is not as easy as you would think. How much do you really know about the product? Here are a few important things you need to know about the drywall.

  1. Not All Drywall Is The Same: You will get numerous types of drywall in the market. There is no surprise why so many homeowners turn to a professional drywall company for assistance. One of the biggest advantages of this material is that it have gypsum. Gypsum is a soft sulfate material that contains water and it helps to stop the expansion of the fire.
  2. It Is Not Just A Wall: Drywall is not only used for walls and ceilings. But it is also the material to decorate the room. It is also used to make shelves, partitions, arched openings, false ceilings, moldings, and many more. It is one of the best solutions when you want to decorate your room in an easy way.
  3. It Can Be Repaired: There are chances that drywall can crack. If you face this kind of problem, you don’t need to worry, repair of this material is possible. Small cracks and holes can be easily repaired. The great news is that damage that may need the replacement of an entire sheet will not create a mess in your house.
  4. Its Installation Is A Task For Pros Only: Many people think that can install it on their own with many DIY instructions. But it is not as easy as ABC. It requires experience and knowledge to get the job done. Whether it is a lightweight construction material but requires a professional to install it properly.

Let Ontario Drywall And Taping Help You!

Are you planning for a wall remodeling? If you want to enhance the value of your premises, you can install drywall. Let our professionals help you with your project. Give us a call today and we will take care of your project.

What are Type X and Type C Drywall?

by Ontario Drywall |September 7, 2021 |0 Comments | Drywall Installation, Drywall Repair, Tips

What are Type X and Type C Drywall?

Drywalls are a common practice for residential and commercial purposes. However, it is important to know about the difference among the top-rated products in drywall. One thing is clear that due to the water composition, every drywall has its own characteristics. They also differ in the rate at which they can resist fire. Type X and Type C are designed to resist fire in order to increase safety.

So, would this mean that you can have any one of them and it is fine? Well, it is most certainly not! There are huge differences between the two options. And, if you are planning to hire a contractor, then you must know about the differences and consult about them beforehand. Let us explore them.

Type X Drywall

Type X Drywall is about ⅝ inches thick and it is referred to as the first fire code item. It has gypsum, non-combustible glass fibers. They together extend the fire resistance for 1-hour maximum. Of course, there are Type X Shaftliner Drywall that have better fire rate qualities, but they are installed in the shafts, area separation firewalls, and stairwell enclosures.

Type C Drywall

Type C is just the improved version of the Type X drywall. This drywall is available in two options- ½ inches and ⅝ inches thickness. The gypsum core is made of glass fibers that enhance the fire-resisting ability of the product. Along with these, they have vermiculite components additionally that extend the resistance of fire, making it spread slowly allowing time for about 2 to 4 hours.

Are you looking for a service provider for your drywall? Want to have drywall installed, repaired, or maintained? Contact the professionals at Ontario Drywall Taping. The experts here have the best options for you!

5 Different Ways of Drywall Repairs

by Ontario Drywall |March 3, 2021 |0 Comments | Drywall Repair, Tips

5 Different Ways of Drywall Repairs

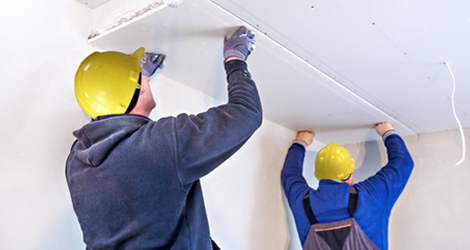
Want to know what kind of drywall suits you the best?

Well, here are some of the points for you to consider to judge what kind of drywall repairs should suit you the best. It is possible that over time, the Drywall wears a lot, and this does not mean that you should have unwanted holes or marks in your house walls.

Learn 5 causes of damage to your walls that the drywall repairs will help create and keep it all delicate and beautiful.

Furniture Marks

Furniture is prone to leave marks on the walls when pressed against them for quite a long time. These markings are undoubtedly annoying and unappealing, but they are one of the most uncomplicated drywall repairs. With a lightly dampened sponge, you can remove these scuffs or marks.

Door Handle Damage

When the door handles are slammed on the walls, the door holes are more likely to occur. Easy to avoid? No, instead, they are more prone to houses of children. These damages are more extensive than the furniture marks. It needs to be patched over, sanded, and repaired.

Nail Hole Damage

The most common damage of Drywall is nail damage. Whether you moved to a new home or need to redecorate your house, rearranging takes away the house’s look if the nail marks are visible. Fill the holes, sand the area, and repaint.

Cracks

Cracks should be taken seriously! They can grow and bring more problems in later stages. It can be due to humidity, temperature, or changing seasons. It can also be because of the poorly laid out foundation or some deterioration in the structure’s framework.

Are you looking for some professionals to help you with your drywall needs? Contact the most trustworthy professionals- Ontario Drywall and taping today!

Drywall taping issues and how to fix it quickly

by Ontario Drywall |October 13, 2020 |0 Comments | Drywall Repair

Drywall taping issues and how to fix it quickly

Drywall taping and mudding are by a long shot the most difficult part of drywall establishment, and it’s the place beginner drywallers run into the most issues. However, while the ability of immaculate completing comes just through training, there are a few basic slip-ups novices make that are handily rectified with a superior method or material, or both.

Here I am listing the major drywall taping problems and how you can fix it in an effortless and quick manner.

Outside Corners Are Rough as well as Fragile
Instead of utilizing standard paper tape on outside corners, put in a couple of additional cash for metal or plastic external corner dot. Corner dot is more sturdy and a lot simpler to introduce than paper-just corners. Spare the paper tape for outside corners that never get any traffic, for example, bulkheads or lookout window shafts.

Inside Corners are Ragged
Try metal-strengthened corner tape. It joins a metal edge with paper ribs for an entirely molded and smooth inside corner. The metal additionally gives your drywall blade a smooth, inflexible surface to ride along when taping the corner.

Mud Drying on Inside Corners
Before you lay the mud, sliced your paper tape to length and pre-wrinkle it. You’ll spare yourself an urgent couple of moments. In case you’re utilizing metal-fortified tape, sliced it to length and have it good to go before mudding the corner. In either case, it’s additionally simpler to quantify for your tape length before there’s mud on the divider.

Drywall Tape Shows Through the Mud
Remember, there are three layers of mud: tape coat, filler coat, and last coat. It may be that you are barring the last coat. The tape really should show through the filler coat; in the event that it doesn’t, your filler coat is excessively thick. In the event that your first last coat doesn’t cover the tape, apply more covers, yet keep them slim.

Looking for expert taping and mudding services in Toronto? ODT is the best place to invest in and get services from industry experts.

Mistakes you must avoid during drywall taping

by Ontario Drywall |September 8, 2020 |0 Comments | Drywall Repair

Mistakes you must avoid during drywall taping

During drywall taping, you might be unaware of various common mistakes. So, in this post, I am going to some expert mistakes listed by Ontario Drywall and Painting that you must not commit ever.

Don’t to skip screw holes when you apply each layer of compound
All that’s needed is a touch of the compound to cover the top of a fastener. Smooth out the compound with your 6-inch joint blade. Just the dimple over the clasp ought to have any mud—the divider around it ought to be totally clear. Wipe the blade over the latch a second time an alternate way to eliminate any overabundance mud.

Don’t to purchase an inappropriate mud
One of the most well-known slip-ups new shapes make is choosing an inappropriate mud. Utilize a “generally useful” or “setting” compound for the underlying coat and for each extra coat—aside from the last coat. Universally handy compound goes on smooth and holds fast well to joints and drywall tape. For the last coat, however, change to a “beating” compound, which makes a fine surface and sands without any problem.

Except if you’re an accomplished shape, avoid “quick setting,” or “hot,” mud that dries rapidly. Hot mud can set up before you get an opportunity to streamline it, leaving you with a great deal of extra sanding.

Don’t cover drywall tape
Applying one layer of paper tape will help limit any opportunity of winding up with a lump in the completed divider. Start by applying a flimsy layer of compound to a solitary vertical joint utilizing a quality blade. Its adaptable edge will disperse mud consistently over the joints. At that point, following applying mud to the whole length of a solitary vertical joint, position a portion of paper tape over the wet mud. Pull the joint blade easily—working from the center of the tape to each end—to bed the tape safely in the mud. Rehash with every single vertical joint. At the point when you tape level joints, cut the tape so it fits between the vertical joints without cover. In the event that they do cover, they will most likely leave knocks.

How To Deal With Water Damaged Drywall?

by Ontario Drywall |August 3, 2020 |0 Comments | Drywall Repair

How To Deal With Water Damaged Drywall?

Walls get damaged by water which is more severe than anyone can imagine. Whether there is flooding at home or pipe leakage, drying everything does not seem enough. You should pay attention to even the smallest signs of damage related to water in your house. 

The most affected component in your house is drywall. Even though they seem alright right now, they might show damages later. And, if the signs are already there, you need to do something of it quick. Here are ways to deal with the damaged drywall with efficacy.

Use proper safety gears
Before working on drywall repair, make sure to have all the needed protective gear and take all precautionary approaches. Wear respiratory protective gear, gloves, ensure to keeps switched off ( if any nearby).

Remove the damaged drywall
Remove only the water damaged drywall; it is not necessary to remove all the panels. If the flood in your house damaged 2.5 feet of the drywall, then remove about 4 feet of it. Mark the level on the drywall with chalk only and cut off the damaged drywall with a knife.

Dry the surrounding area
Removing the drywall is not enough, so dry the nearby area. Make sure there is no moisture as any underlying issues will affect the new drywall panels too. Call up the professional contractors to dry the surrounding area. They come equipped with all the necessary tools and materials to deal with water-damaged drywall.

Sanitize before installing
Sanitization is important when it comes to saving drywalls as moisture is one of the biggest threats. It is important to make sure that there will be no development of molds and for that sanitization is a must. 

Paint new drywall
Once you remove the drywall, sanitize the area, and also dry up the nearby area, it is time to install new drywall and paint them. The paint will act as a sealing coat and simultaneously provide a uniform and smooth appearance.

Drywalls can be tricky and thus call Ontario Drywall and Tapping for a professional service of drywall repair.